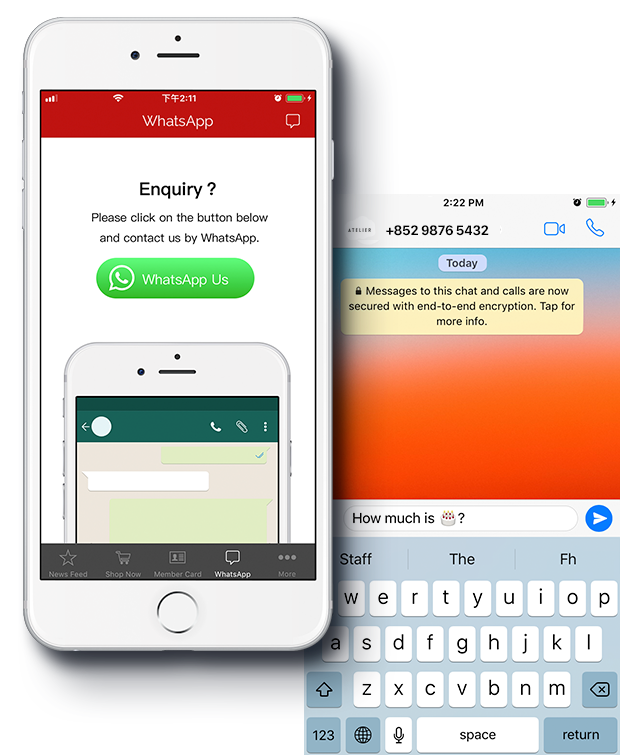
Add on WhatsApp Chat Button, accelerate the response to customer enquiries

By adding a WhatsApp Chat Button in App Kuma, shop owners can provide real-time customer support to their enquiries. Chat with customers on-the-go helps shop owners boost the customer experiences as well as increases customer trust & loyalty towards your brand.

Edit Information and Design

Appkuma supports a variety of custom functions, including Languages, Themes, Edit Menu Functions, Add Branches Information and more.

Customize Information and Languages

Customize Information

You can insert image and text freely. The update will appear immediately without the need update on App Store.


How to insert customized information?

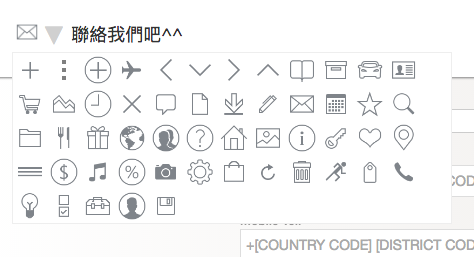
Edit existing content in “Function” (e.g., About Us) or click “+Add New” to add new custom content page, hyperlink etc.


Languages

Appkuma supports 18 languages including Traditional Chinese, Simplified Chinese, English.


How to add a language?

In “Design” select “+Add More Language”, you can select up to 3 interface languages.
E.g., 繁體中文, English, 日本語
*Note: If selected multiple languages, it is necessary to add contents to all of them

Choose your favorite App icon, Welcome page, Theme

Edit/upload icon and welcome page image

In “Design” select “App Icon & Welcome Screen”, you can select a photo and crop its size.


Suggested image ratio and size

App icon: 1:1 Ratio, best size with 500px(width) x 500px(height), 72dpi
Welcome page: 9:16 Ratio, best size with 1080px(width) x 1920(height), 72dpi


Select Themes

In “Design” select “Select Layout”, you can select prefabricated themes or make you own one.

Customize menu content and order

In “Function”, you can freely customize menu content and order:

Point to the button you wish to move, hold down “” then slide to anywhere you want.


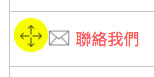
Select a page and directly edit its name and icon.

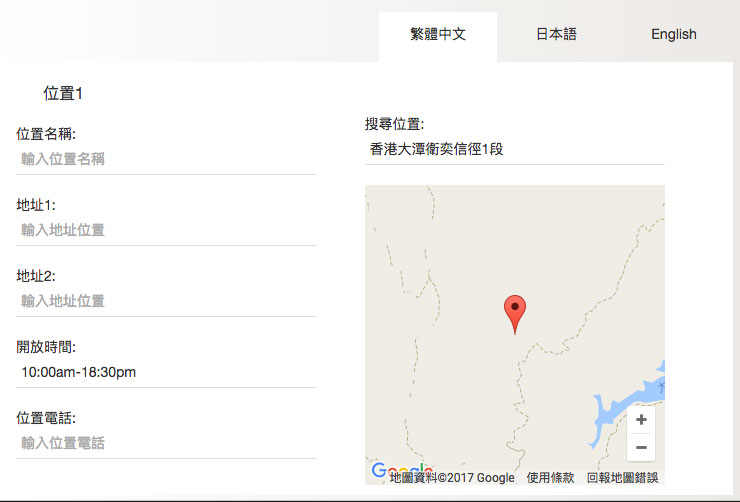
Display branches map and location, opening time and contact number

Insert map to display branches location, opening time and contact number.


Insert branches
In “Function” select “+Add New” then select “Location” and select “Add Branch”.


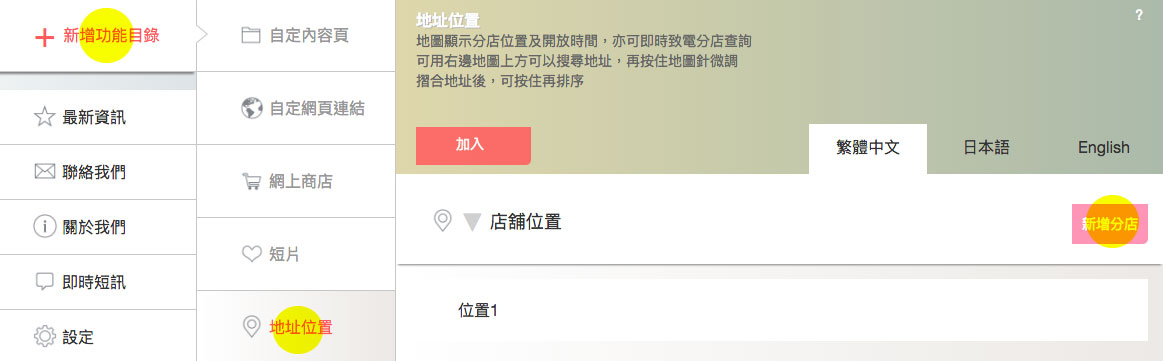
Enter content, click “Add” when done.

Design, Publish and Promote Information

Appkuma mobile app design platform supports a variety of features, fulfills the needs of different businesses.

Sync with Facebook page posts

Appkuma automatically sync with your Facebook page, every time you post on your Facebook page, Appkuma will update its news feed too. There is no need to post the same thing two times, saving your time.


I only want my app to sync some certain things on my Facebook page, what should I do?

In ”Function” select ”News Feed”, click “Facebook Post Filter Option”. If enabled, only Facebook post with #appkuma or #app tag will be shown.

News feed

Other than posting on Facebook, you can also post directly post on Appkuma

How to post on Appkuma?

  1. In Appkuma manage page option, select “Public Post”
  2. Click “New”
  3. Upload photo and content then click “Post”

You can see the update on your app immediately.

Albums

AppkumaAppkuma can sync with your Facebook page’s albums update automatically.


How to add an album?

  1. In “Function” edit ”Album” or select “+Add New” add ”Album”
  2. Select album, then click add
  3. You can view the update on the app immediately
Insert YouTube videos

You can insert YouTube Playlist, like Music, Entertainment, Information, Tutorials, sync automatically.


How to insert YouTube playlist?

  1. Create a playlist on your YouTube account
    ((Related tutorials please refer to https://goo.gl/fD0vAG )
  2. In “Function” select “+Add New” and add “Video”
  3. Paste playlist link, and click “Add”
    E.g., https://www.youtube.com/playlist?list=PLWahjRCqyk707sXSwbgpgAFaeRBbq-P7O
Release limited O2O coupons

You can release limited time/amount O2O coupons, attracting your customers to spend more on your physical store or joining functions.


How to make O2O coupons?

  1. In Appkuma manage page menu select “Public Post”
  2. Click “New”
  3. Upload image and discount contents
  4. Click “O2O coupon”, enter expire date and coupon amount, then click “Post”


How to use O2O coupon?

  1. Users can directly exchange coupon in the app
Push Notification

Appkuma supports Push Notification function, sending users news feed and offers

How to send Push Notification?

  1. In Appkuma manage menu select “Public Post”
  2. Enter title* and content (supports Emoji), and click “Send”

*Only Android phone can display title

Embedding online store

To provide a user-friendly experience, it is recommended to use an online store that supports mobile view. Insert an existing online store or start a new store, let your customers to shop and pay on their mobile.

Insert existing mobile version online store

If you already have an online store that supports mobile view like Shopify, Shopline, Mshop. You can go to “Function” select “+Add New” add “Online Store”.

Enter the weblink, click “Add” to finish.

Start a new online store

If you want to start a new online store, you can go to https://www.mshop-app.com/start a new one immediately*.
*Mshop is doing a limited offer

Customize Content Page:

Insert Images, Texts, Payment Button and more, freely

You can insert images, texts, buttons etc.
E.g., Content like About us, Payment method, Gift claiming method, QR code, PayPal payment button etc

Edit Images and Texts

You can use the editor to edit texts, images, videos and HTML

Add Icon for main functions

Text effect design
Insert tables
Images (upload directly or insert link)
Videos (YouTube, Vimeo, Vine, Instagram, DailyMotion or Youku)
Link
View in HTML

Payment Button (e.g., PayPal)

You can directly insert HTML payment button.

  1. Login PayPal (example)
  2. In “Tools” select “All Tools”
  3. Click “PayPal Button”
  4. Select “Create New Button”
  5. Enter all the contents, then click “Create Button” and copy the code
  6. In “Custom Content Page” select (code view) switch to HTML view, then paste the code
QR code

You can directly insert images with QR code.
E.g., Weblink, Text, Contact card, Contact number etc

  1. Use QR Code Generator (example), enter the content and generate the QR code
  2. Click “SAVE”, save the image as PNG file
  3. In “Custom Content Page” insert image

Customize Hyperlink:

Insert third party services, easily create an appointment, table and more

You can freely insert links, using third party services, add more features
For example: Reservation system – e.g. www.setmore.com
Forms and questionnaire – e.g. www.typeform.com
Instant voting system – e.g. www.directpoll.com
360 Photos – Google Business Photo
Ordering system – e.g. www.gloriafood.com

Reservation system
  1. Go to Setmore (example) and create a reservation form
  2. In Setmore (example) select “App & Integration”, and select “Visit Your Page”
  3. Copy your Setmore (example) reservation website
  4. In Appkuma “Function” select “+Add New” insert ”Custom Hyperlink”
  5. Paste the weblink and click “Add”
Forms and questionnaire
  1. Go to Google Form (example) or Typeform (example) and create a form or questionnaire
  2. Copy your Google Form (example) or Typeform (example) link
  3. In Appkuma “Function” select “+Add New” insert “Custom Hyperlink”
  4. Paste the link and click “Add”
Instant voting system
  1. Go to Directpoll.com (example) create a vote
  2. Copy your Directpoll (example) link
  3. In Appkuma “Function” select “+Add New” insert “Custom Hyperlink”
  4. Paste the link and click “Add”
360 Photos
  1. Take a panorama with a camera, or using an app like Street View or Google Camera to take a 360 photo
  2. Upload your photo to Google, and copy the link
  3. In Appkuma “Function” select “+Add New” insert “Custom Hyperlink”
  4. Paste the link and click “Add”
Ordering system
  1. Go to Gloriafood.com (example) and create a menu
  2. Copy your Gloriafood (example) link
  3. In Appkuma “Function” select “+Add New” insert “Custom Hyperlink”
  4. Paste the link and click “Add”